How To Stencil An Old Mirror Back To Beautiful
How To Stencil An Old Mirror Back To Beautiful
Stenciling can transform anything into a stunning conversation piece. It allows you to quickly create a sophisticated multi-color look of designer wallpaper or any artistic design element at a fraction of the cost.

I’ve had so much fun stenciling furniture before but I’ve never attempted it on yes, a mirror! I’ve seen pictures of it done before so I knew I had to tackle it. It was such a fun leaving curve for me and the best part is if you don’t like the way your first run turns out you can easily wipe it off and start over! You don’t often get that opportunity when stenciling furniture without a huge headache that’s for sure.
It all started when I decided to refinish an old decorative mirror that was a part of a bedroom set I had. I loved this piece and knew it would make a lovely wall artist piece. After refinishing it, it was time to address the slightly damaged mirror itself. Rather than replace the glass, I knew stenciling it was the answer.
This is what it looked like before I refinished it. You can’t see the nicks and scratches but they were there.


One side note – it’s super frustrating to take decent pictures of this mirror because it’s in my upstairs foyer and the angle is impossible to capture. Even with a lighting kit it still creates shadows and since I didn’t want my reflection in the photos the angle was always awkward.
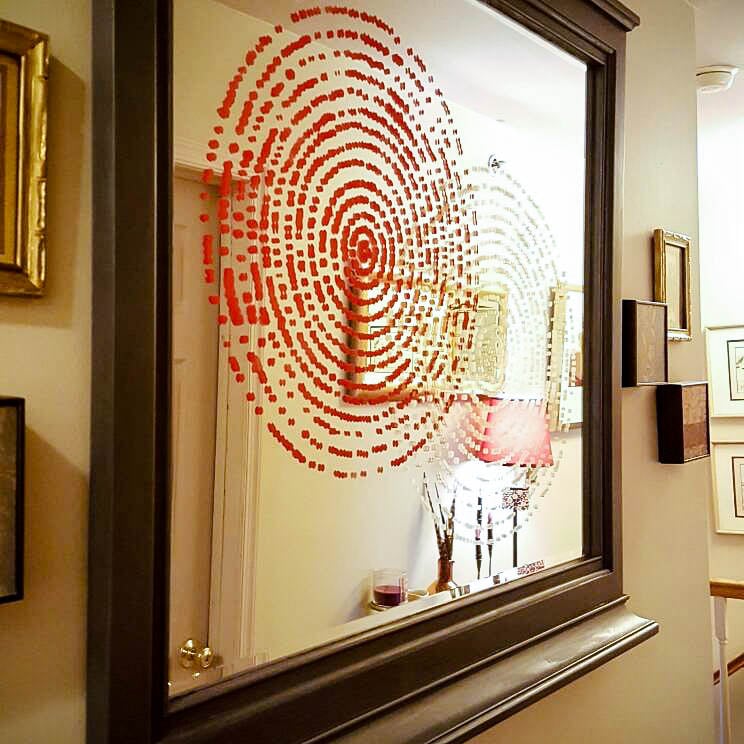
Regardless, I think you can still get a good feel for just how beautiful it turned out.


I saw the perfect stencil over at Cutting Edge Stencils and I knew it would add the perfect elements of geometric design I had in mind.
Cutting Edge Stencils designs and produces the best stencils for DIY home décor and crafts. It’s a collaborative expression between long-time professional decorative artists, Janna Makaeva and Greg Swisher. Together, they ran the New York area’s leading decorative painting company, Spec Fin (Specialty Finishes), and completed hundreds of high-profile decorating projects. Lovers of the arts and all things beautiful, Janna and Greg have a common goal: To empower today’s Do-It-Yourself-er, to teach and to share their wealth of painting and decorating knowledge, and to inspire you to “Go For It!”
They have a wonderful and exciting assortment of products to choose from and have an awesome tutorials page too. Be sure to check out their blog as well. It’s loaded with exciting ideas for so many projects! 
This is the stencil design that won my heart. It’s called Resonance and can be used for so many exciting projects.
It’s described as: “This cool modern stencil is inspired by sound wave patterns. We call it “Resonance” and feel that it captures the nature of radiating vibrations. You can create a stunning wall effect with this modern stencil. Use this design in a free-form manner or lay out your pattern on your wall ahead of time using little pieces of blue tape. This design is perfect for contemporary interiors, or when a subtle background pattern is appropriate. It looks stunning in metallics, golds, silvers or even tone-on-tone. The stencil is very forgiving and easy to use. You can create very interesting textured plaster effects with this pattern and experiment with DIY curtains and furniture embellishment.”
This is an easy design to stencil with a dense foam roller. For expert stenciling tips, please watch their How to stencil videos! You’ll find them extremely helpful for your stenciling project. Even beginners get great results!
Some key elements to remember when stenciling are:
First, be sure to anchor your stencil to your mirror to prevent slippage or movement. I used Frog tape. Be sure to position it securely to the mirror.

Determine what tools you prefer to use. Rollers and brushes are perfect. I decided to use a small paint roller. You can also use stenciling brushes as well. Cutting Edge Stencils has a wonderful assortment of them at terrific prices.

Test your paint colors first. Be sure to test your colors on a blank piece of paper first to make sure they are exactly what you want. The paint colors I chose were a bold red and a stunning slightly shimmering gold.

Again, super frustrating trying to capture the right angle – you can’t fully appreciate just how stunning the colors turned out via the images but in real life, I am thrilled with how it turned out.

You can also use an adhesive spray to keep the paint from coming off. I didn’t on this piece because I’m not going to be spraying cleaning on it and will spot clean any areas if they need it.
It’s such a delight to know that I’ve turned my old mirror into a work of art I can enjoy every day.

And as a bonus – I get such a kick out of the beautiful stencil shadow it casts on my walls and doors!

Here are some other stunning examples of what you can do with this stencil! I used the same overlapping technique on my mirror. It’s my favorite.

This work of stencil art is gorgeous! I am really tempted to give this a whirl soon!

Why hang artwork when you can easily and inexpensively create it yourself? The example below is breath-taking.

I love the colors in this overlapping stencil too. Paired with some white accent pieces, it’s a work of art in itself.

I am thrilled with the results. I can’t wait to use this stencil again for some other upcoming projects.

Let me know if you have any questions – you can leave them in the comment section below.
I hope you get to enjoy transforming an old mirror or stenciling a plain wall soon. It’s a DIYers dream and so much fun too!
PIN IT for later!

And as always, thanks so much for stopping by! If you like this post, How To Stencil An Old Mirror Back To Beautiful, subscribe via email below and never miss a post again!


I would like to stencil throw pillows. Really like their PAISLEY and MOROCCAN TILES Stencils.
I am so inspired Carolann. I never would have thought to stencil a mirror. This opens up so many possibilities so thank you. I like how you mention that the pattern gets cast onto your other walls and objects, I love that effect so much. I loved your mirror makeover and now I love it more.
Hi Marilyn, Oh, I love that one! I think I’ll have to add that one to my wish list. Good luck and thanks for entering!
Carolann
Thanks so much Sue! It is so much fun to see the reflection of it on my walls. It’s so soothing. Your kind words always mean so much to me. xo
Carolann
The French Poem Allover Wall Stencil is beautiful. I think I’d buy it.
Really love this project — very pretty! Who ever thought to do that to a mirror?
This give me more inspiration to do stencil work to my daughter’s room. I love how she did it on the mirror. I didn’t know that could be possible. I wish to win! I could start the project right away!
I would love the Chevron to pick from Cutting Edge if ever I win! Thanks for the opportunity!
LOVE LOVE LOVE the stenciled mirror!!!
I love all of the mandala stencils. I prefer the gratitude style but they’re all gorgeous. I think I may stencil on my ugly drop ceiling tiles!
Hi Shannon, Oh yes, I love that one. Good luck with your entry!
Carolann
Thanks so much Diane! It was so much fun to create too. Always good hearing from you and Happy New Year!
Carolann
Yes for sure Shiela. Good luck with your entry!
Oh, I love that design too! Good luck with your entry Shiela!!!
Thanks so much Celia! It was so much fun to create. Good luck with your entry! Have a great weekend.
I do too! Good luck with your entry Mary and have a great weekend!
There are so many I love, but for what I need right now I would have to pick http://www.cuttingedgestencils.com/alhambra-tile-stencil-asulejos-spanish-tile-wallpaper.html. Perfect for the project I am working on.
Hi April,
I love that stencil it’s beautiful. Good luck with your entry! Hope you stop back again soon.
Carolann
I love, love this mirror! It’s such a unique piece of art now! Great project!
Love love love what you did with this mirror. Thanks for the great inspiration. Ofcoarse I’m entering your giveaway for the Lily scroll allover stencil. Thanks so much for hosting.
Carolann this is so gorgeous! The colors you choose are always so bold and daring and they always make such a grand statement. I love it!!!!
Thanks Michelle! It was much fun to create and everyone that walks past it loves it. Have a great rest of the weekend!
Thank you Anj, I love it. It was such a fun project to work on! Can’t wait to see yours!
Thanks much Michelle, I had so much fun with this project and can’t wait to use that stencil again soon.
I love the texture that the stencil adds to the mirror. It was beautiful before, but now … it is just WOW. Great job on this one Carolann!
Thanks so much Heather. It was so much fun to create. I can’t wait to do another one!
What kind of paint did you use? I seem to have a problem stenciling on glass…
Thanks for your help
Hi Jen,
I used chalk paint. I think the key is not applying too much and using a small roller to apply it. Let it dry well and don’t clean the mirror just use a feather duster to keep it clean. I’ve used two different chalk paints on mirrors and they both turned out great. The one for this mirror is from County Chalk Paint. Here is the link of another project I used it on with the product links for you. https://sassytownhouseliving.com/transform-furniture-blah-beautifully-bold/
thanks again for stopping by and hope to see you again soon.
Carolann
Carolann, that Mirror with the stencil looks so beautiful! What a great job you did. It looks hard to do.
Thanks so much Patti! It’s always so great hearing from you! XO