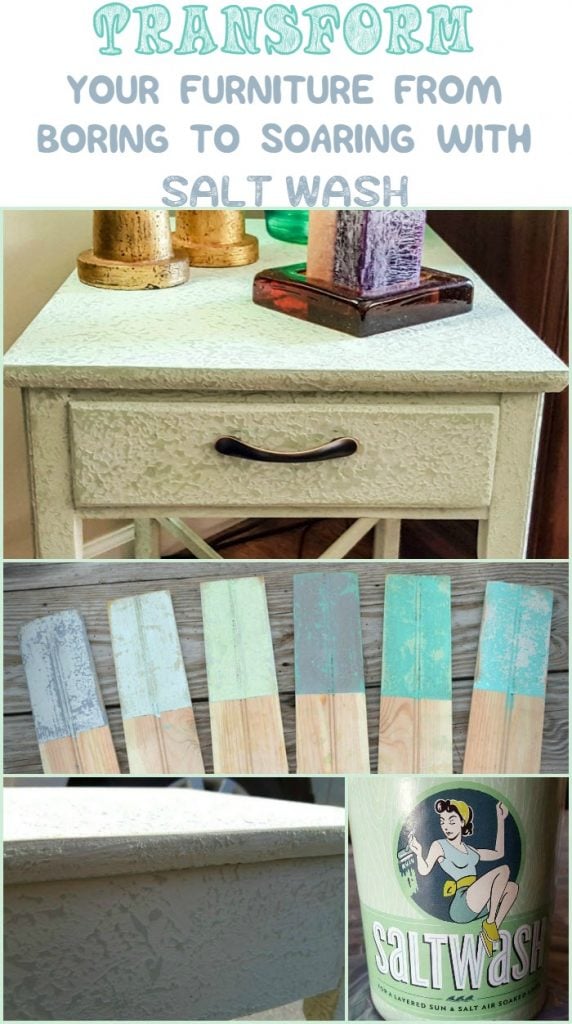
Transform Your Furniture From Boring To Soaring With Salt Wash
If you love refinishing your furniture then you are going to flip over this transformation. In an instant, you can achieve this chic and affordable genuine vintage look. There’s never a reason to throw away that old or damaged furniture. And now, there’s even all the more reason with Salt Wash!
Salt Wash is the solution to utterly transform those curbside rescues or those pieces of furniture that are badly damaged. Saltwash™ is a product, invented to create a unique weather-worn, layered sun and salt air soaked look in just two quick steps. Saltwash™ is made with real sea salt. Be sure to visit their site to read more about this amazing product!
Transform Your Furniture From Boring To Soaring
From the minute I started mixing it I fell in love. I’ve never seen anything transform furniture like Salt Wash. You’ll get to achieve any look you like from shabby chic to that beachy vibe in no time at all.
When I saw this “almost” curbside table I knew I had to rescue it. I say almost curbside as I ended up paying $20 for it which equates to the “almost” part. I knew it had potential and with Salt Wash, I could easily transform it into a beautiful piece to be enjoyed.
It was kind of a mess and needed some love to restore it back to beautiful. I also wanted to give this piece a coastal beachy look and I love the way it turned out. I knew sea green paint colors would help me get there.

I started by prepping the table. I wanted all of that old varnish gone to have a clean slate to start with.

You can use any paint you like with Salt Wash! Yep! It can be any finish paint as well. You get to decide.

I started with the darker shade of sea green first. That’s what I used for Salt Wash. The second coat was about 4 shades lighter sea green. All you do is mix Salt Wash into your paint and stir to achieve the desired look. It’s supposed to be painted on very “gloopy”. Let the first coat dry and after it dries, you paint your second coat without Salt Wash – wait until it all dries and sand.
All you do is mix Salt Wash into your paint and stir to achieve the desired look. It’s supposed to be painted on very “gloopy”. Let the first coat dry and after it dries, you paint your second coat without the Salt Wash – wait until it all dries and sand.


Once you have the coverage you need, let it sit to dry. It dried pretty quickly. You can do some light sanding at this phase to smooth out some of the bumps.

I then applied my second coat of paint which was the lighter shade of sea green over the top of the coat with the Salt Wash.

Next step and last is the sanding. You can choose to sand as much or as little as you like. Once you achieve your desired look, you are ready to go. It doesn’t need a sealer or any type of top coat but again, your preference. I chose not to use one for this end table as I wanted that beachy worn and weathered look.

I just love the depth and dimension you get from using Salt Wash. The sanding exposed the beautiful underlayer of darker green giving it that worn and weathered beachy look I was looking to achieve.


I changed the hardware and again, a quick and stunning transformation.

This little end table has added that extra element to my living room that I was looking for.

I love the contrast of colors and tonality of the entire end table.

Adding your favorite decorative elements really brings out the beauty of the end table.

I hope you get to experience the multitude of looks and styles you get from using Salt Wash. I know I’ll be creating a lot more transformations with it!
Don’t Forget To Pin Your Inspiration!


I love how your table turned out. Saltwash is amazing and so much fun to work with.
Carolann I love the green! The table looks great in that room!
Carolann this turned out AH-MAZING!! The colors are so pretty and the sanding was perfect to blend them together. You did such a great job.
Wow… what an amazing transformation! Love your tutorial, too. Hope you enjoy your beachy table… it surely is a gem. All the best in the contest, too! XO Susie
This is such a beautiful,update & I love the pop of color it brings to your space! Gorgeous!
Carolann, this is so nice I cannot find the words to say how much I love how your table turned out. The difference is so dramatic and I think the color, the color is so different and dreamy. Now, I want to try Salt Wash too.
Loving the addition of this table to your space! It really does lighten it up a bit. That salt wash looks amazing, I really need to give it a try. Thanks for such a great tutorial! Can’t wait to see what you come up with next!
Thanks so much Debra, I just adore that salt wash so much and can’t wait to use it again. Have a wonderful day!
Thanks so much Sue! I just adore that salt wash so much and can’t wait to use it again. Have a wonderful day!
Thanks so much Michelle, I had so much fun with salt wash. I can’t wait to use it again! xo
Thanks much Qs! I had so much fun with salt wash. I can’t wait to use it again. xo
Carolann this came out adorable! I love the color combo! Amazing!
Thanks so much Michelle, I love working with Salt Wash…I can’t wait to use it again. Have a wonderful holiday weekend xo
Huge transformation. Just beautiful! The color and texture is perfect coastal.
Pinned to share! =D
You will love the salt wash Sue. I can’t wait to use it again. Thx so much. We are really enjoying the piece. xo
Thanks much Heather. It was so much fun using salt wash. I can’t wait to use it again. I know you are going to love it too.
Thanks so much Stefanie!I love using salt wash and can’t wait to use it again. Have a wonderful holiday weekend!
Thanks so much Robin! I just loved using salt wash and can’t wait to use it again. I love your blog. I’m spending some time on there now. Have a wonderful holiday weekend.
Wasn’t this the most fun product to work with? We are addicted! Your table looks beautiful!
Thanks so much Vickie! I absolutely loved it! Thanks so much for stopping by and have a wonderful holiday weekend!
I adore the green Carolann, looks just like a frothy wave. Love it!
I absolutely love this! It’s such a nice and unique touch that can be applied to any piece of furniture!
Hi Brenda, thanks so much! I had so much fun with that salt wash and can’t wait to use it again! Have a wonderful rest of the week.
Carolann
Hi Morgan, Thanks so much! I loved using salt wash and can’t wait to use it again on another piece. It was a pleasure hearing from you and hope you stop back again soon.
Carolann
Don’t mind me. Just stopping by again to admire your beautiful table and to thank you for sharing it with us at Friday’s Furniture Fix. XO Susie from The Chelsea Project
Thanks so much Susie. I always love seeing your smiling face. xo
this is so not boring anymore!! high five!!
& thank you so much for linking up to WASTE NOT WEDNESDAY link party! We love having you!!
Thanks so much! I’m a new fan of your site! Have a wonderful weekend!
What an amazing transformation! Your “new” table look modern and beautiful. It colors gone perfect with the room. Thanks for sharing a great table remodeling ideas. I will check your blog regularly for new posts.
Hi Edward, I really appreciate your kind comment. I love the table too. Salt Wash is an amazing product to work with. Thanks again so much for stopping by and I hope to see you again soon.
Carolann
Love what you did with the stand, I have an old tv cart and was wondering on what to do. Plan to do this technique and then add some wallpaper with wildlife and decopage for a cousins livingroom.
Then I have an old bookcase I want to do for a granddaughter. Now the juices are flowing. Thank You
HI Barbara, That sounds like a wonderful plan! I’m glad you have some exciting projects lined up. It’s so much fun transforming old furniture, isn’t it? I’d love to see what yours looks like when you are done. thanks so much for stopping by and hope to see you again soon! Wishing you all wonderful holidays too!
Carolann
Hey Carolann, I am not familiar with Saltwash! Thanks so much for bringing it to my attention. It really transformed that little side table into something fun. Thanks for the tutorial.
Hugs, Lynn
I have not tried the salt wash yet but I love how this turned out! Now I’m going to have to give it a try!
thanks so much Leanne. I am mad about salt wash and can’t wait to use it again. It’s like nothing I’ve ever tried before. Have a wonderful weekend!
Carolann xo
Hi Lynn,
I am so in love with salt wash and can’t wait to use it again. As soon as the weather stays warm I have a project in mind for it. It’s so unique I just love it. Have a wonderful weekend!
Carolann